Saw Trax protects your investment.
Vertical Panel Saws are Big, Heavy, and Expensive pieces of machinery. When you are investing the money into these products, we invest the time in crating and shipping them properly. We want you to get the product you expect in the condition you expect it in.
Take a look at the steps we take when preparing your Vertical Panels Saw for shipment.

Step 1:
The small components are packed away in boxes to be secured to the Saw Frame (See Step 4). The Cord Holder is secured horizontally to the Saw Frame’s fence lip.
Example: The Sign Maker’s Series ships with 3 small component boxes. Other units have only 2 boxes with additional boxes added for accessories ordered. 888-729-8729 Updated 07-30-2020


Step 2:
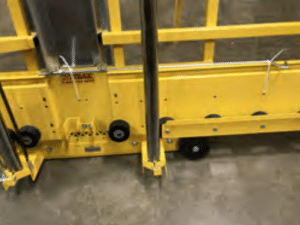
A wooden base is custom built here in the warehouse, and the Panel Saw Frame is placed on top and secured to it using metal bands.


Step 3:
The Saw Frame and pallet are then boxed in with 2×4 planks and plywood. Additional wood blocks are placed under the frame in the guide tube brackets to support and prevent shifting during transportation.


Step 4:
The boxes containing the small components are placed on the Saw Frame and kept in place with more metal bands.


Step 5:
The Vertical Panel Saw is then wrapped in black manufacturing cling wrap and all labels are placed on the outside. A strap with wall mounting hooks is attached to secure the crated Panel Saw to the walls of the transporting truck.
Importance of Crating when Shipping a Vertical Panel Saw

Safeguarding Your Investment with Saw Trax
In the realm of industrial machinery, Vertical Panel Saws stand out as substantial, weighty, and financially significant acquisitions. Recognizing the substantial investment associated with these products, Saw Trax prioritizes meticulous care in both the crating and shipping processes. Our commitment is to ensure that the product you receive aligns precisely with your expectations, arriving in impeccable condition.
An examination of our rigorous preparation procedures reveals the dedication we invest in securing your Vertical Panel Saw for shipment.
Procedure Overview for Safely Shipping Vertical Panel Saws:
Individual components are meticulously packed into designated boxes, with provisions for attachment to the Saw Frame in subsequent steps (refer to Step 4). The Cord Holder is affixed horizontally to the Saw Frame’s fence lip. Notably, specific models, such as the Sign Maker’s Series, are shipped with three small component boxes, while others may include additional boxes for separately ordered accessories.
- It’s involves a meticulous process of organizing and securing the various small components that accompany the Vertical Panel Saw. These components, integral to the functionality of the machinery, are methodically packed into specialized boxes. Notably, the configuration of these components is designed with the subsequent attachment to the Saw Frame in mind, as elucidated in Step 4 of the shipping process.
- One specific component, the Cord Holder, is affixed horizontally to the Saw Frame’s fence lip, ensuring a secure placement and facilitating a streamlined assembly upon arrival. For instance, in the case of the Sign Maker’s Series, the shipping package comprises three distinct small component boxes. It is essential to note that the packaging approach is adapted to different models, with variations in the number of boxes to accommodate the specific features and accessories associated with each unit. Additional boxes may be incorporated to cater to separately ordered accessories, providing a tailored shipping solution that aligns with the diverse requirements of our clientele.
- The attention to detail during this initial step underscores Saw Trax’s commitment to delivering a product that not only meets but exceeds the expectations of our customers. By investing the necessary time and care in the packaging of small components, we aim to ensure a seamless and efficient assembly process for end-users, thereby enhancing the overall user experience and satisfaction with our Vertical Panel Saws.

A bespoke wooden base, crafted on-site in our warehouse, is created to accommodate the Panel Saw Frame. The frame is then carefully positioned on the base and securely fastened using metal bands.
- It’s involves the construction of a customized wooden base, a pivotal aspect of the shipping process for Vertical Panel Saws. This meticulous crafting takes place within the confines of our warehouse, where skilled artisans employ precision and attention to detail to create a foundation that is specifically tailored to accommodate the unique characteristics of each Panel Saw.
- The construction of the wooden base is a deliberate and measured process. Expert craftsmen assess the specifications of the Panel Saw Frame, ensuring that the dimensions and requirements are taken into account during the creation of the base. This bespoke approach is a testament to our commitment to precision and excellence, as it allows for a snug and secure fit of the Panel Saw on the base.
- Once the wooden base is crafted to perfection, the Panel Saw Frame is carefully positioned on top of it. This placement is not arbitrary; it is a strategic alignment that ensures optimal stability during the subsequent stages of transportation. To fortify this connection and further safeguard against any potential movement or vibration during transit, robust metal bands are employed to securely fasten the Panel Saw Frame to the wooden base.
- Therefore, embodies a fusion of craftsmanship and engineering, where the expertise of our team is harnessed to create a foundation that not only supports the physical weight of the machinery but also guarantees its structural integrity throughout the shipping journey. This tailored and secure foundation is a key component of Saw Trax’s commitment to delivering Vertical Panel Saws in pristine condition, ready for seamless installation and utilization by our discerning customers.
The Saw Frame and its associated pallet undergo encasement with 2×4 planks and plywood, ensuring robust protection. Supplementary wooden blocks are strategically positioned beneath the frame within the guide tube brackets to provide support and minimize movement during transit.
- The meticulous process of preparing Vertical Panel Saws for shipment reaches a critical juncture where emphasis is placed on the comprehensive protection of the Saw Frame and its associated pallet. This step is instrumental in safeguarding the machinery from the rigors of transportation, ensuring that it reaches its destination in optimal condition.
- Having securely positioned the Saw Frame on the purpose-built wooden base in Step 2, the next step involves an additional layer of shielding. The Saw Frame and its accompanying pallet are enveloped in a robust casing crafted from 2×4 planks and plywood. This strategic encasement serves a dual purpose: shielding the machinery from external factors such as dust, moisture, and potential impact, and providing a durable structural reinforcement against the dynamic forces encountered during transit.
- To further enhance the stability of the assembly, wooden blocks are strategically introduced under the frame within the guide tube brackets. These blocks play a crucial role in providing supplementary support, effectively reducing the risk of movement and potential damage that could occur during the shipping process.
- It’s exemplifies Saw Trax’s commitment to the meticulous care and attention invested in every stage of the shipping process. By employing a multi-layered approach to protection, encompassing both structural reinforcement and strategic support, we aim to deliver Vertical Panel Saws that not only meet but exceed the expectations of our customers upon arrival, ensuring a seamless transition to operational use. This comprehensive strategy underscores our dedication to the preservation of our customers’ investments and the longevity of our high-quality machinery.

Boxes containing the pre-packed small components are strategically arranged on the Saw Frame and firmly secured with additional metal bands.
- The focus turns to the meticulous arrangement of the smaller components that were securely packed away in this. These components, integral to the functionality of the Vertical Panel Saw, are strategically placed on the Saw Frame as part of the comprehensive preparation for shipment.
- The boxes containing the pre-packed small components are thoughtfully positioned on the Saw Frame, ensuring a systematic and secure arrangement. The placement is carefully orchestrated to optimize space utilization and to prevent any potential shifting or displacement during transit. This step is particularly critical, as it sets the stage for the subsequent assembly process upon the Vertical Panel Saw’s arrival at its destination.
- To further fortify the arrangement, additional metal bands are employed, securely fastening the boxes in place on the Saw Frame. This measure not only ensures that the smaller components remain intact but also minimizes the risk of any unintended movement during the transportation phase.
- This strategic organization of small components in it is emblematic of Saw Trax’s commitment to delivering a product that is not only well-protected during transit but also arrives with the convenience of an organized assembly process. By taking these meticulous steps, we aim to streamline the setup of the Vertical Panel Saw for our customers, providing an efficient and user-friendly experience upon receipt of the machinery.

The entire Vertical Panel Saw assembly is enveloped in black manufacturing cling wrap, and external labels are affixed. To further enhance stability during transportation, a strap featuring wall mounting hooks is attached, firmly securing the crated Panel Saw to the walls of the transporting vehicle. This comprehensive packaging and securing process is designed to safeguard the integrity of the Vertical Panel Saw during transit. For inquiries or assistance, please contact 888-729-8729 .
- The meticulous packaging process for Vertical Panel Saws culminates with the application of a final layer of protection and the implementation of measures to secure the machinery for safe transportation.
- The Vertical Panel Saw assembly, now configured with the Saw Frame, securely attached small components, and additional reinforcements, undergoes the final stage of encapsulation. The entire assembly is enveloped in a layer of black manufacturing cling wrap. This industrial-grade cling wrap serves as a barrier against dust, moisture, and other potential environmental factors that could compromise the integrity of the machinery during transit.
- Simultaneously, external labels containing essential information about the shipment, handling instructions, and other pertinent details are affixed to the outside of the cling wrap. This ensures that handlers and recipients have clear and accurate guidance for the proper care and handling of the Vertical Panel Saw.
- To further secure the crated Panel Saw during transportation, a robust strap equipped with wall mounting hooks is attached. This strap serves as an additional layer of reinforcement, securing the crated assembly to the walls of the transporting truck. This measure not only minimizes the risk of movement but also enhances stability, safeguarding the machinery against potential shifts or vibrations during transit.
- Encapsulates Saw Trax’s commitment to delivering Vertical Panel Saws with the utmost care and attention to detail. By employing industrial-grade materials for protection and implementing secure strapping techniques, we aim to ensure that our customers receive their machinery in impeccable condition, ready for efficient installation and optimal performance. This final step reflects our dedication to providing a seamless and secure shipping process that aligns with the high standards we set for our products.

